
Hands-on Machine Learning Project
In this article, we will learn how to convert audio notes into text documents. Sometimes we get these brilliant ideas at random places but feel lazy to write them down. Then guess what happens to those ideas? We forget them. I know this from my personal experience.
I find myself a lot thinking of some fantastic project ideas when I am walking or biking. It’s kind of a challenge to write them down at that particular moment. So, what do I do?
I open up the voice memo app and then tap record. Quick and easy.
Then, when I get home, I listen to those audio recordings and write them down. I enjoy the process, but sometimes I feel lazy to listen to my recording and take notes. Couldn’t there be an easier way than listening each time? In the age of Machine Learning and Artificial Intelligence, of course, there is.
Then, let’s build our speech-to-text program to make this process better. We will learn how to do it in this hands-on tutorial.
Let’s begin!
Table of Contents:
- Getting Started — AssemblyAI
- Step 1 — Libraries
- Step 2 — Audio Recording
- Step 3 — Speech to Text Transcription
- Final Step — Exporting the Result
Getting Started — AssemblyAI
There are many speech-to-text cloud services and APIs available. Here is a nice post going through the top free and open source speech-to-text services available.
In today’s tutorial, we are going to use AssemblyAI’s Speech-to-Text API. It is a very well-trained artificial intelligence API.
It’s free to use. You will get a unique API key after creating an account. We will use that API key to use the services.
And as a coding environment, I am going to use Jupyter Notebook. I am sure you’ve used it if you are into data science and machine learning projects.
Step 1 — Libraries
After creating a new notebook, we are ready to import our libraries. Python has excellent libraries; some are builtin into the language itself, and some are third-party libraries.
Libraries are a great way to achieve specific tasks without reinventing the wheel. There are excellent programmers out there that created libraries and made them open source. Isn’t that so cool? This is one of the reasons why I enjoy programming.
Anyways, back to our project. The libraries that we will need are built-in libraries. We don’t have to install anything. Here is the code block to import them into our program.
import sys
import time
import requests
Step 2— Audio Recording
In this step, we are going to import an audio recording into the program. This recording can be anything; a short voice memo or a long lecture recording. For this project, I will use a short recording of me reading the introduction of this article.
And since we are using an API service to do the speech recognition, the recording must be uploaded to cloud storage. This cloud storage can be AWS, Google Cloud, or AssemblyAI’s storage. I will use their cloud storage to keep things on one platform.
I will move the recording into the same folder as my Jupyter notebook. And then define it in the program.
filename = "voice_memo_1.m4a"
Now, let’s write a function to read this audio recording file. By the way, the file format should be an audio format for our reading function to work correctly. Apple’s voice memo app saves the recordings in m4a format. You can learn about different video and audio formats in the following article:Extracting Speech from Video using Python
Simple and hands-on project using Google Speech Recognition APItowardsdatascience.com
def read_audio_file(filename, chunk_size=5242880):
    with open(filename, 'rb') as _file:
        while True:
            data = _file.read(chunk_size)
            if not data:
                break
            yield data
It’s time to upload our audio recording into AssemblyAI’s cloud storage.
headers = {
    "authorization": "Your API Key"
 }
response = requests.post('https://api.assemblyai.com/v2/upload', headers=headers, data=read_audio_file(filename))
print(response.json())
Great! After running this code block. We will get a response from the API. The response messages will include the url link of the uploaded file.

Step 3 — Speech to Text Transcription
It’s show time! Let me tell you a great part of using a cloud API; everything happens in the cloud. Your laptop or PC doesn’t need to spend any power to do the recognition.
All you need is an API token, which will build a connection from your device to the cloud. As you may know, even the gaming industry is evolving into Cloud platforms. I think that’s so cool!
Here is the official documentation if you want to learn more.
Alright, shall we start our speech-to-text transcription? We need to define three variables: one string and two dictionaries.
speech_to_text_api = "https://api.assemblyai.com/v2/transcript"
json = {
  "audio_url": "The upload url link from the previous step"
}
headers = {
    "authorization": "Your API Key",
    "content-type": "application/json"
}
response = requests.post(speech_to_text_api, json=json, headers=headers)
print(response.json())
After running this code block, our request will get into the cloud and wait for it’s turn to be processed. Here is the response that I got:

The id key is the id of the request. That’s how we will track it. It’s basically like an order tracking number. And then, the status key shows the status of the request. As you can see, it’s showing that it is “queued.”
Final Step — Exporting the Result
Almost there! In this final step, we will check the status of the speech-to-text request that we made earlier. And we will retrieve the returned result and export it into a text document.
Let’s follow up on our request.
request_url = "https://api.assemblyai.com/v2/transcript/ request id goes here"
headers = {
    "authorization": "Your API Key",
}
response = requests.get(request_url, headers=headers)
We will have a long dictionary with many keys and values. And one of those keys will have the recognized speech. It’s called the “text” key. Let’s find out what we got.
Here is the code to access a specific key-value from a dictionary:
recognized_speech = response.json()['text']

Now, let’s export the recognized speech using some basic python programming.
with open('result_1', mode ='w') as file:
   file.write(recognized_speech)
   print("ready!")
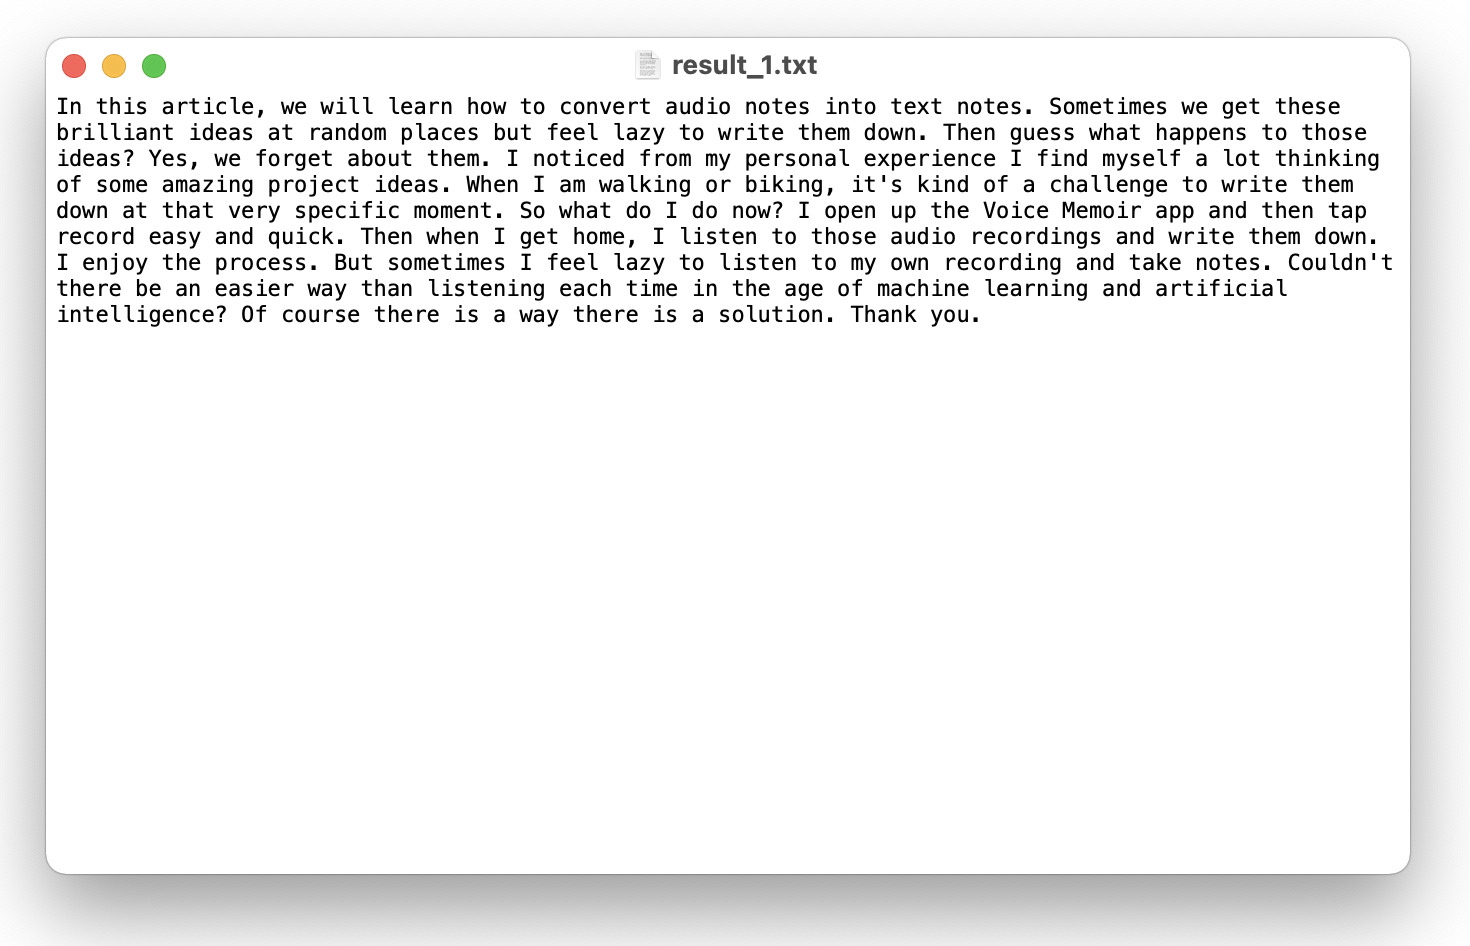
Let’s have a look at our saved text docuemnt.
Congrats! In this hands-on tutorial, we learned how to turn our voice recordings into text documents using programming. I enjoy creating this kind of project because they are real examples of machine learning and artificial intelligence in our daily lives. Hoping that you enjoyed reading it and learned something new today. Feel free to contact me if you have any questions.
I am Behic Guven, and I love sharing stories on programming, education, and life. Subscribe to my content to stay inspired. Ty,
If you are wondering what kind of articles I write, here are some:
