
Content Moderation using Artificial Intelligence
In this article, we will learn how to program a Discord bot that can moderate the channel’s content for us. Content moderation is essential for public spaces where different kinds of people are connecting. We feel safe when we are on an online platform. Online communication is an important subject that needs more awareness and attention.
Content moderation has been a common practice used by many social media platforms, especially when the platform’s users mainly generate the content. Content moderation is actively being used in some areas, are social media, marketplaces, dating apps, and online discussion forums.
In this project, our focus will be content moderation in voice-based platforms. Discord channels would be one of the best places to implement our content moderator. There are many types of content moderators out there, from real people to automated moderators. As you can understand from the title of this article, our content moderator will be an artificial intelligence bot.
Table of contents:
- Getting Started
- Step 1 — Libraries
- Step 2— Connecting a Bot to Discord Channel
- Step 3— Functions
- Step 4— Discord Commands
- Final Step — Testing the Program
Getting Started
In this project, we will learn how to use an online API through software like Discord. We will use AssemblyAI’s Speech-to-Text API to perform content moderation on audio messages shared on Discord channels. In other words, with content safety detection, AssemblyAI can detect possible unsafe content is spoken in our audio/video files and return precisely when and what was spoken.
The trained model can recognize more than a dozen different topics; some can be listed as Gambling, Hate Speech, Drugs, Negative News, and more. It will be interesting to find out how it performs. If you want to learn more, here is the documentation of the Content Moderation service by AssemblyAI.
Let’s get started with the libraries.
Step 1 — Libraries
For this project, we will be working on a code editor. The libraries will be installed and then imported into the python program. We need five libraries: os, Discord, dotenv, requests, and JSON.
Before using them, we have to install them. OS and JSON are already installed with Python. So, we have installed the other three libraries with PIP. PIP is a python library manager. We can install multiple libraries in one line of code. Run the following line in your terminal window:
pip install python-dotenv requests discord.py
Furthermore, here are the official documentation links for these main libraries:
Now, let us import them.
import os
import discord
from dotenv import load_dotenv
import requests
import json
Step 2 — Connecting a Bot to Discord Channel
This step will cover how to create and connect a bot in Discord. I will not go into details here for the bot creation part, but if you want to learn more, there is an excellent article written by Eric Chi: Build a Discord Bot with Python.
After the bot process is done, we will go inside our project folder, create a new file and rename it “.env.” This file will store our API keys. It looks like this:
DISCORD_TOKEN = {Your Discord API Key}
DISCORD_GUILD = {your-guild-name}
Now, let’s get back to our main program. So far, we just imported the libraries. It’s time to load the environment file that we just created.
load_dotenv()
TOKEN = os.getenv('DISCORD_TOKEN')
client = discord.Client()
Then, we will write an async function to sync with the Discord API. We will print a message in the terminal window when our bot connects to our Discord channel.
@client.event
async def on_ready():
    print(f'{client.user} has connected to Discord!')
client.run(TOKEN)
Here is a screenshot of our project file by the end of this step.

You can go ahead and run this python program. Before moving to the next steps, let’s make sure our bot connects without any issues.
When you see the following two signs, that means your bot is all set:

Step 3 — Functions
Creating a bot and connecting it to our Discord server was a little complicated but this step will be much easier. We will have an idea how to use an API cloud service.
In this step, we are going to write three functions. Here is the list of functions and what they do:
- upload_audio: This function uploads the audio file from the project folder to AssemblyAI’s cloud storage. The API’s response gives us the URL address of the uploaded audio. We will use it when running speech-to-text on the cloud.
- get_transcript: This function is where we turn on the content moderation functionality. We are passing the content_safety key with a True value under the JSON dictionary inside the function. The response from the API will have the request URL, which is how we can track the request’s status and get the results.
- check_result: This function is helping us to check the status of the request sent in the previous function. If the request is completed, it will have the result in the content safety for us.
Here are the functions. We will see them in action in the final step of this article.
Upload Audio
def upload_audio():
    audio_data = "audio_message.mp4"
    endpoint = "https://api.assemblyai.com/v2/upload"
    def up_audio(audio_data, chunk_size=5242880):
        with open(audio_data, 'rb') as audio_file:
            while True:
                data = audio_file.read(chunk_size)
                if not data:
                    break
                yield data
     headers = {
        "authorization": "API Key"
     }
    response = requests.post(endpoint, headers=headers, data=up_audio(audio_data))
    return response
Get Transcription
def get_transcript():
    endpoint = "https://api.assemblyai.com/v2/transcript"
    json = {
        "audio_url": upload_url,
        "content_safety": True
    }
    headers = {
        "authorization": "API Key",
        "content-type": "application/json"
    }
    response = requests.post(endpoint, json=json, headers=headers)
return response
Check Result
def check_result(request_id):
    request_url = "https://api.assemblyai.com/v2/transcript/" + str(request_id)
headers = {
        "authorization": "API Key"
    }
response = requests.get(request_url, headers=headers)
return response
Step 4 — Discord Commands
In this step, we are going to do some fun things. We will define the commands that will trigger the functions. Moreover, these commands will come from Discord chat. That means our code will simultaneously listen to the conversation written in the chatbox. When a particular word passes, it will call the defined function. Since we want it to listen as long as the program run, we will use an async function. Let’s get started.
Firstly, we have to define two variables outside of the function. They will be global variables; we want to store their values when the function is called multiple times.
Secondly, we are writing the on_message function. Here is the list of the particular keywords that I defined. I have also added a dollar sign to differentiate them from regular messages easily; feel free to replace them with different words.
- $hello: the bot will respond with “Hello!” in the chatbox. Just to test things out.
- $upload_fun: the bot will run the upload_audio function and then print out the URL of the audio in the chatbox.
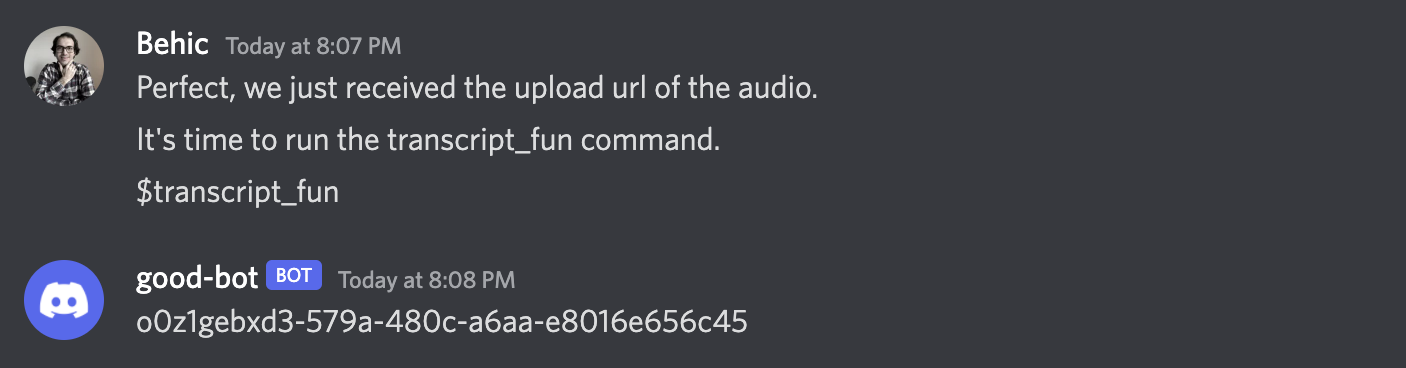
- $transcript_fun: the bot will run the get_transcription function and print out the request-id in the chatbox.
- $check_fun: the bot will run the check_result function to check the status and print it out for us. We will run this word until we see that the status is showing completed.
- $result_fun: After seeing that the API has completed our request, it is time to get the results.
response_id = ""
upload_url = ""
@client.event
async def on_message(message):
   if message.author == client.user:
        return
   if message.content.startswith('$hello'):
        await message.channel.send('Hello!')
   if message.content.startswith('$upload_fun'):
        response = upload_audio()
        global upload_url
        upload_url = response.json()['upload_url']
        await message.channel.send(upload_url)
   if message.content.startswith('$transcript_fun'):
        response = get_transcript()
        global response_id
        response_id = response.json()['id']
        await message.channel.send(response_id)
   if message.content.startswith('$check_fun'):
        response = check_result(response_id)
        response_status = response.json()['status']
        await message.channel.send(response_status)
   if message.content.startswith('$result_fun'):
        response = check_result(response_id)
        response_transcript = response.json()['text']
        await message.channel.send(response_transcript)
Final Step — Testing the Program
Perfect! Everything looks great on paper so far. Let’s see them in action!
Here is the scenario: You receive audio through Discord, and before listening to it, you want to run a content safety check to have an idea of the audio recording.
I picked a short clip from a podcast with Elon Musk about social media for our test run. Here is the video version on YouTube. I have renamed and formatted the recording as “elon_speech.mp3”. It is inside the same project folder as our main program. Now, let us run our main program from the terminal.
When we see the following message printed, the bot has joined our Discord playground.

Now, let’s go to our Discord app and start messaging the bot. Then, run the commands in order and see the bot’s responses:
$hello

$upload_fun

$transcript_fun
$check_fun

$result_fun

So, what are we looking at?
Well, multiple things are going on here. First, the text version of the speech contains potential safety red flags. Moreover, right after the text, we see the label; in this case, it says “profanity.” Then we have the confidence score and the timestamps where this speech is passing.
Our bot has identified three unsafe parts from this video. The identified contents are profanity, weapons, and sensitive social issues.
Conclusion
Congrats! We learned how to build a Discord bot and connect it with a cloud-based speech-to-text API in this article. Our program has returned the labels and timestamps where potential unsafe topics are discussed. This project can be improved by adding the functionality of cropping out the detected timeframes from the original video.
Working on these projects is a great way to apply our machine learning and artificial intelligence skills to our daily lives. Hoping that you enjoyed reading this guide and learned something new today. Let me know your thoughts?
Feel free to contact me if you have any questions.
Some programming posts you might like:
I am Behic Guven, and I love sharing stories on programming, education, and life. Subscribe to my content to stay inspired. Ty,
