Are you new to AWS? — This tutorial is designed for YOU.
Welcome to step-by-step guide to building a web application using AWS
In this article, I will show you how to build a simple web application on AWS. First, we will create a static web application that displays “Hello World.” Then, we will discover how to incorporate different AWS features into the web application and see how they work together.
This project is an excellent introduction to the cloud computing platforms. If you are new and just getting into cloud services, don’t worry. It’s never too late to start learning something new. I am glad you made it here.
In this project, as you can guess from the title, we will use AWS, which stands for Amazon Web Services; an excellent cloud platform with endless services for so many various use cases from training machine learning models to hosting websites and applications (Around 200 AWS services are available as of writing this article).
If you are ready, let’s get to work. Here is the structure that we will follow in this article.
Table of Contents:
- Step 1 — Getting Started
- Step 2 — AWS Lambda Serverless Function
- Step 3 — Connecting Lambda Function to Web Application
- Step 4 — Creating a DynamoDB Table
- Step 5— IAM Policies and Permissions
- Final Step — Testing the Web Application
Step 1 — Getting Started
In this step, we will learn how to deploy static resources for our web application using the AWS Amplify console.
Basic web development knowledge will be helpful for this part. We will create our HTML file. As mentioned earlier, the website will be straightforward, a heading saying “Hello World!”
As a code editor for this project, I used Atom. Feel free to use your favorite. Here is the code snippet of the page:
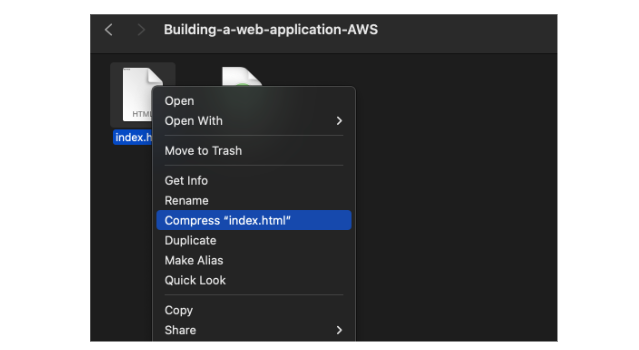
There are multiple ways to upload our code into Amplify console. For example, I like using Git. To keep this article simple, I will show you how to do it directly by drag and drop method into Amplify. To do this — we have to compress our HTML file.
Now, let’s go to the AWS Amplify console. It will look something like this:

When we click “Get Started,” it will take us to the following screen (we will go with Amplify Hosting on this screen):


I’ve created an Amplify application project and named it “Step1.”
Then, I dropped the compressed index file. Amplify deployed the code, and returned a domain URL where we can access the website.

For now, this is how our website looks like:

All done for this step! Our static HTML code is deployed and live, thanks to AWS Amplify.
Step 2 — AWS Lambda Serverless Function
We will create a serverless function using the AWS Lambda service in this step. AWS Lambda is a computing service that lets us do tasks without using full-time running computing engines. Instead, only works when something invokes it; a very efficient solution.
To give you some idea, a great example of Serverless computing in real life is vending machines. They send the request to cloud and process the job only somebody starts using the machine. You can learn more about AWS Lambda from here.
Let’s go to the Lambda service inside the AWS console. By the way, make sure you are creating the function in the same region in which you deployed the web application code in Amplify. You can see the region name at the top right of the page, right next to the account name.
Time to create a function. For runtime programming language parameters: I’ve chosen Python 3.7, but feel free to choose a language and version that you are more comfortable and familiar with.

After our lambda function is created, we will see the following screen:

Now, let’s edit the lambda function. Here is a function that extracts first and last names from the event JSON input. And then returns a context dictionary. The body key stores the JSON, which is a greeting string.
After editing and saving lambda_function, let’s go ahead to the Test tab and create an event.

Here are the execution results after we deployed and ran the test:

The execution result has the following elements:
- Test Event Name
- Response
- Function Logs
- Request ID
Step 3— Connecting Lambda Function to Web Application
In this step, we will deploy our serverless lambda function to our web application. We will use API Gateway to create a REST API that will let us make requests from the web browser. API Gateway service, as we can understand from its name, is just like a bridge between the back-end and the application’s front-end.
REST: Representational State Transfer.
API: Application Programming Interface.
Let’s go ahead without losing time and open the API Gateway service from the AWS console, then create a new REST API.
API Gateway service main page:

API creation page, we are giving a name, choosing protocol type and endpoint type for our REST API.

And in the next page, we create a POST method from the Actions button. The integration type will be a lambda function, and ensure the Region is the same Region you’ve used to create the lambda function.

Next, we will enable CORS, which stands for Cross-Origin Resource Sharing. It’s an HTTP header. Then click Enable CORS and replace existing CORS headers.

After enabling CORS headers, Deploy API from API actions.
Which will create a new stage; you will see it under the Stages tab on the left bar. When you view the stage, there will be a URL on top named Invoke URL. Make sure to copy that URL; we will use it to invoke our lambda function in the final step of this project.
Time to test our REST API.
Under the Resources tab, after clicking on POST, we will see the method execution screen. The Test page will come up when we click on the button that I circled below.

Step 4— Creating a DynamoDB Table
In this step, we will create a data table in Amazon DynamoDB, another AWS service. DynamoDB is a fully managed NoSQL database service that supports key-value data structures.
DynamoDB Dashboard:

Let’s click Create table and fill out some information about our data table:

Then, let’s view the details of the table and copy the ARN, which stands for Amazon Resource Name:

We will use the ARN in the next step when creating IAM access policies.
Step 5 — IAM Policies and Permissions
IAM: Identity and Access Management
I know what you are thinking. Policies are a boring topic, and I was feeling that way — until I realized how policies play an essential role in keeping us safe. AWS recommends a least-privilege access model, which means not giving a user more than needed access. The same rule applies to AWS services.
For example, even for this simple web application project, we have already worked on multiple AWS services: Amplify, Lambda, DynamoDB, and API Gateway. It’s essential to understand how they communicate with each other and what kind of information they share. If you want to learn more about this, here is the official documentation section covering policies and permissions in IAM.
Back to our project.
The policy we will define here will give access to our lambda function to write/update the data table that we created using DynamoDB.
Let’s go to AWS Lambda console. And choose the lambda function. Then let’s go to the configuration tab, and we will see the execution role. Click the link, which will take us to the configuration settings of this function.

From permission policies, let’s create a new inline policy.

And then, let’s add the following code to the JSON section.
{
"Version": "2022-11-10",
"Statement": [
    {
        "Sid": "VisualEditor0",
        "Effect": "Allow",
        "Action": [
            "dynamodb:PutItem",
            "dynamodb:DeleteItem",
            "dynamodb:GetItem",
            "dynamodb:Scan",
            "dynamodb:Query",
            "dynamodb:UpdateItem"
        ],
        "Resource": "YOUR-DB-TABLE-ARN"
    }
    ]
}
This policy will allow our Lambda function to read, edit, delete, and update items from the DynamoDB data table.
Lastly, we will update the lambda function python code. It’s on the main page where we’ve found the execution role in the configuration tab.

Here is the Python code that goes inside the function:
The response is in REST API format. After making the changes, make sure to deploy the code. After the deployment is concluded, we can Test the program from the orange-colored test button.
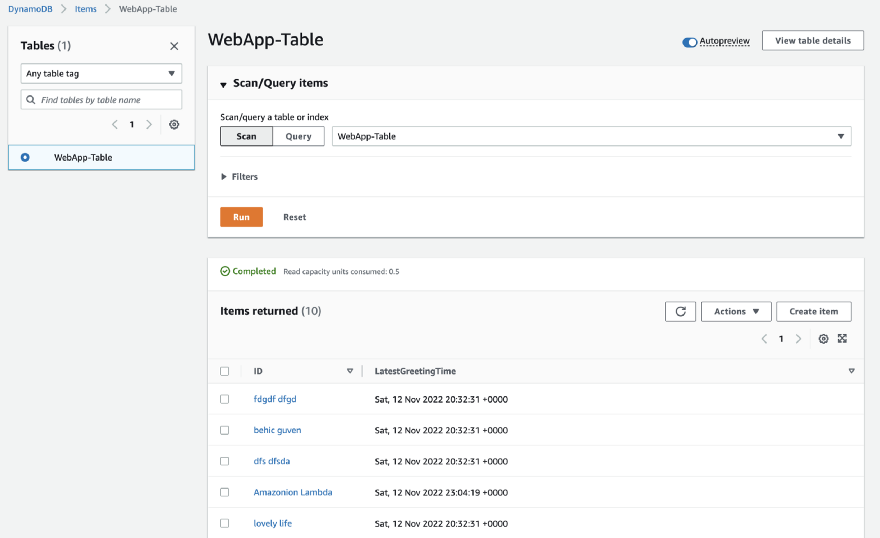
We can check the results from the DynamoDB. When we run the function it has updated our data table. When we go to AWS DynamoDB, choose your table and click Explore items from left nav bar. Here is the object returned from the lambda function:

Final Step— Testing the Web Application
Congrats on making it this far!
In this final step, we will see everything we just built in action. We will update the front-end to be able to invoke the REST API with the help of our lambda function and receive data.
First, let’s open a new file inside our code editor and add the following lines of code (I saved it as index.html):
Before you save it, make sure to update the api-key text. You can find it on the API Gateway service under your REST API details, called invoke URL. The code is on line 34, where we fetch the URL link with the requestOptions variable.
When the code is all set, we will export it as a compressed file, just like in step 1. Then, upload the file to AWS Amplify using the console.

Our data tables receive the post request with the entered data. The lambda function invokes the API when the “Call API” button is clicked. Then using javascript, we send the data in JSON format to the API. You can find the steps under the callAPI function.
You can find the items returned to my data table below:
Conclusion
Congrats! We have created a simple web application using the AWS cloud platform. Cloud computing is snowballing and becoming more and more part of developing new software and technologies. Here is an article where I shared the top cloud computing platforms with certification programs. I would be glad if you learned something new today from this article.
Working on hands-on programming projects is the best way to sharpen your skills. Feel free to reach me if you have any questions or feedback about the project. I will do my best to get back to you.
I am Behic Guven, and I love sharing stories on programming, education, and life. Subscribe to my content to stay inspired. Ty,
If you are wondering what kind of articles I write, here are some:
